Web-based Remote Lab System for Instrumentation and Electronic Learning
 , Agustin Agüera-Pérez, Jose Carlos Palomares-Salas, Manuel Jesús Espinosa-Gavira, Olivia Florancias-Oliveros, Juan José González de la Rosa
Adv. Sci. Technol. Eng. Syst. J. 6(4), 100–109 (2021);
 DOI: 10.25046/aj060412
Lab sessions in Engineering Education are designed to reinforce theoretical concepts. However, there is usually not enough time to reinforce all of them. Remote and virtual labs give students more time to reinforce those concepts. In particular, with remote labs, this can be done interacting with real lab instruments and specific configurations. This work proposes a flexible configuration for Remote Lab Sessions, based on some of 2019 most popular programming languages (Python and JavaScript). This configuration needs minimal network privileges, it is easy to scale and reconfigure. Its structure is based on a unique Reception-Server (which hosts students database, and Time Shift Manager, it is accessible from the internet, and connects students with Instruments-Servers) and some Instrument-Servers (which manage hardware connection and host experiences). students always connect to the Reception-Server, and book a time slot for an experience. During this time slot, User is internally forwarded to Instrument-Server associated with the selected experience, so User is still connected to the Reception-Serer. In this way, Reception-Server acts as a firewall, protecting Instrument-Servers, which never are open to the internet. A triple evaluation system is implemented, user session logging with auto-evaluation (objectives accomplished), a knowledge test and an interaction survey. An example experience is implemented, controlling a DC source using Standard Commands for Programmable Instruments. This is an example regarding how systems enable students to interact with hardware, giving the opportunity of understand real behaviour.
1. Introduction
In Engineering learning, Lab sessions act as a reinforcement of theoretical concepts, taking a really important role in student education, e.g. manipulate diodes in lab, examine threshold and only positive conduction, gives an additional level of knowledge, increasing student interest and making putting in order some of theory studied. However, there is usually not enough time to put in practice all theoretical concepts, due to time limitations to access to physical lab sessions. In this line, more experiences can be offered, expanding lab access time to 24/7, this is Remote Labs.
Sometimes, Remote Lab concept is put together with Virtual Lab (a simulated experience). When these two options want to be compared, few concepts should be considered, as stated in [1]. There, cost and effect over learning are studied. Conclusions of that work postulate that the increase of the cost of Remote Lab is compensated by the improvement in the learning process, due to students are more involved when they feel that they are interacting with real equipment.
Remote labs allow students to access expensive lab Instruments, and specific configuration, any time, in order to put in practice concepts studied in theoretical lessons. Remote access to labs instruments is gaining attention in order to grant access to students, which cannot be there (medical problems, case of force majeure, or other excused absence). Nowadays, at 2020 globally outbreak of COVID-19 is one of those cases of force majeure, which has turn into remote as more activities as possible.
First option for Remote Labs is to use a commercial equipment, as VISIR, as stated in [2], [3], which is a matrix of connections and components, where student can change connections. This same philosophy can be applied to matrix connections to servers, for networking lab [4]. In other situations, Remote labs are mixed with virtual labs, an example is Easy Java Simulations (EJS) as stated in [5]. This system, designed for simulated experiences (virtual labs), can be connected with hardware (oscilloscopes, engines, sensors, etc.) to perform an interactive experience.
There are too non-commercial systems in Remote Labs, e.g., as stated in [6], [7], where Labicom, a complete new system was designed. Server, client, solutions, all ad-hoc solutions are designed.
Even a compact solution has been developed, all integrated in a Raspberry Pi, as stated in [8], hosting a webserver, with an Arduino as sensor interface.
Other implementations, as the stated in [9], proposed a complete system for flexible Remote Lab testing, based in Lab Server and Web Server. It is a good approach for distributed systems, due to all communications are done throw the internet. However, it requires for each Lab Server, external access, if it is in a corporate network, it is a complex, or impossible configuration.
Even there are different approaches for Remote Labs, centred in collaborative work, as stated in [10]. This work is centred in a system where few students can work together in the same experience.
With a general study of the work, as stated in [11], it can be observed that these solutions are only a part of the problem, and it is demonstrated that a system structure stable, flexible and scalable is needed.
However, all reviewed Remote Labs systems are not enough flexible, due to hardware compatibility are limited, or web interface are not enough intuitive. The aim of this work is to design a structure and function of a Remote Lab system for engineering learning, flexible, in order to be able to connect any Instrument (with computer interface), scalable (in order to add nodes) and with the required data security level.
With that objective, servers are designed using the programming language Python, one of the most popular programming languages with several libraries, which allows interacting with almost any device. In addition, it can be set up as a web server, providing sufficient level of security and simplifying and ensuring data storage. The user interface is designed in HTML and JavaScript, introducing a fluid and asynchronous experience.
This work is structured as follows: in section II general lines and objectives of this project are given; then in section III the system structure is explained, followed in IV, where the relation with learning and examples are explained, the evaluation methods for learning outcomes are explained in section V, finally conclusions are given in section VI.
2. System Objective
The aim of this work is to present a complete Remote Lab solution which can implement experiences related with engineering learning. This system must manage user login, and user data, guaranteeing their privacy, and must have a time shift manager, in order to create time slots for remote experiences, allowing users to book them. In addition, networks requirements needed for the implementation in a complex network must be minimal, due to University networks are usually really complex.
This proposal must allow students the interaction with Lab Equipment from anywhere (from the internet). For that, only one Student can use each lab site at time. With this aim, time-slots are set, in order to coordinate students access. With this, Lab Instruments can be used beyond the Lab sessions hours.
2.1. Basic System Design
Experiences offered in remote experinces should be addequated to lessons. So it should be configurable, with the posibility to have some experiences in the same lab site, allowing to offer multiple remote experiences with the same equipments.
In reation with network requirements, learning labs use to be in complex networks, wich any special requiremnt (as direct access to a computer from the internet) is a risk for all the network. For that, only one system would have direct acces from the internet. This single system would manage user data, login and book system, at the time proxy conection to lab sites. Systems connected to lab equipments are in internall network, so it does no suposse a risk to the network, and only requiere a static IP.
User (student) connects to this single computer, for book a experince, in a specific time slot, for take the experince, or for take the evaluation excercises. All user interaction is done via this computer (connections, forwardings, data transmissions, or other procedures to connect user with remote lab station), so user seem to interact always with the same server, in the same web-site.
Aim of this remote lab system is to reinforce of theoretical knowledge, so test learning result is one fo the most important things in the process. The most dificult thing is to know if the experience has been done as designed (without any interaction problem). Interaction problems cause difficulties in perform laboratory practice and difficulty in acquiring knowledge, and aspect as camera quality is essential for a propper interaction. In order to know if some kind of problem in experince design (interaction site, software conectors, conection speed, camera quality, camera ilumination, etc.) could cause problems at taking the experience, a fast survey must be done for every user after take an experience.
Moreover, knowledge is evaluated in a multiple way. Examinig the experince itself (steps accoplished, time taken, total time in finish experince, tries for step, etc.) and an auto-evaluation is geenrated. And after the experince, a knowledge test must be take by user. This test include the knowledges concepts included in the experince, in order to confirm that experience has helped in reinforce that knowledge.
For a fair use of the systen, a limit at booking time slots must be considered. Deppendig on the number of users and time slots availables for take each experince, more or less condittions should be applied. It is recommended a limit of only one time slot booked by user, but sometimes, it should be considered additional limts as one try for each experince by user (at least until all users have done that experince). Time slots are created, and number of remote lab stations are limmited. So this limits are really importat in some situations.
Time slot sould not be the same for all experinces, and even some experinces can be done simultaneously, if both use different equipments connected to the same remote lab station. Roles for that situations are implemented in remote lab stations. Time slots are calculated according to expriences time length, taking in consideration that some time is needed among time slots for intialize instruments.
Remote lab stations have instruments grouped by experinces compatibility, this is a set of instruments that can be used for many experiences. They are designed as much flexible as possible, but with just the needed instruments, in order to create as much as remote lab stations as possible. This is, a remote lab station can be done with a controlable DC source, a Fuction generator, a Multimeter and a Oscilloscope. These equipments can be used for a huge set of experiences in the areas of electronics (analog and digital). However, many experiences can be done only with a DC controlable source and mutimeter, and many others just with a function generatorn an oscilloscope and a fix DC source. So with almost same Lab Instruments, two lab stations can be done (for a lower set of experiences) or one (for a higher set of experinces, including more complex ones). Deppending on the kind of experiences wich want to be done, and the number of users, Instruments are gruped in one way or another.
With that, a clear idea of the system has been given, now a description of the system implementation is going to be done.
3. System Structure
Proposed remote lab system structure is organized around two types of servers, as explained before. One single server, which manage the whole system, and one server per remote lab station. All of then must have implemented a web-server, for enable the user web interaction, in addition with the application programming interface (API) interaction. This is a machine-machine interaction, via web-request. For this propose, servers need a back-end programming, and web interface needs a front-end design and programming.
For the back-end (all procedures and services done by the server, hidden by the user, as web server itself, camera stream, user login, data management, etc.), Python language have been selected. This is a really extended and supported language, in continuous development, with many packages, which gives many extra functionalities to it. In particular, a framework for web-server creation have been selected, Flask, which manage user login, connections, interactions, and more. This will be explained in more detail in both server types description.
For front-end (user interaction experience, including visualization and data interchange with backend), in web sites HTML and CSS are used for design appearance of websites, and JavaScript is used for introduce “programming” in web sites. While HTML and CSS design the content and structure, this design is static, and only can change at web site refresh. JavaScript allow elements resize and reorganize at window size change, update data without refresh all the website, even process data inside the browser, in the user computer.
Moreover, Python and JavaScript are the most popular languages in 2019 as stated in [12], [13], which grant many support and community. A schema about languages used are shown in Figure 1.
3.1. Instrument-Server
First, remote lab station will be examined. These stations are composed of a set of instruments, components and connections, and a server, which manage that hardware. That server is named Instrument-Server, and host remote lab experiences and manage the communication with instruments, using a module named Instrument-connector.
Instrument-Server is a web-server with many functions, with the back-end designed in Python, relation with hardware is done in an easy way with calls to Instrument-Connector. This module involves all procedures to communicate with hardware. Python has libraries for exchange data via GPIB, USB, and LAN, using VISA protocols, RS-232, and many others, with them, and Instrument documentation, a set of functions are designed for each Instrument, for access to all needed functions. Sometimes, procedures would be a single line, others a set of command exchange. Finally, from Instrument-Server, Lab Instrument interaction is done as a single call to Instrument-Connector.
The specific structure of this module depends of the specific hardware connected, but if we have a GPIB interaction with a Multimeter, from Instrument-Server there would be an instruction “read_voltage()”. Inside Instrument-connector, in the address selected for the instrument, some order are sent (mode voltmeter, range-auto, read) and then return is taken from GPIB bus from the address of the Multimeter. All this sequence, with time among them, watchdogs, and other specifications of GPIB, and error handle, are managed by the method read_voltage()”, which is simply called from the Instrument-Server and returns the voltage.
In relation with data, Flask gives a package, called, Flask-SQLAlchemy, which allows the use of Object-Relational mapping (ORM) of databases. This is defining a data set as an object (a programming class), linked with a database. Schema for tables, interaction instructions, or other database operations are hidden by the programmer, and a programming object is manipulated. Moreover, instructions are the same for different database types, as SQLite, PostgreSQL, MySQL, Oracle, MS-SQL, Firebird, Sybase and others. That gives freedom to not only change database server, even change database technology, without changing code.
In order to provide beautiful, flexible and configurable front-end, a HTML design, structured with CSS is done for the basic structure, with JavaScript for content reaction. In order to allow in-frame video streaming, and variable exchange with the back-end (with instrument-connector and data storage) without the needed of refresh the site, “Asynchronous JavaScript and XML” (AJAX) is used.
JavaScript and, in particular AJAX, allow to implement a complete program in the user we browser. When this is join with API interaction with the back-end, experience is half front-end half back-end. This allows front-end access data, but only with the filter considered by API, so non-illegal (non-allowed by design) actions can be done with back-end data or over Instrument-control.
User interaction and functions related are implemented in the front-end (in JavaScript) and steps (values, validation, sequences, steps done, etc.) are implemented in back-end. In this way, user cannot modify variables related with the progress or grade of the experience.
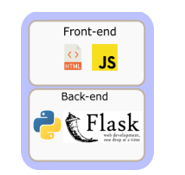 Figure 1: Basic structure of technologies in the Remote Lab system
A lab experience is a set of data in back-end and front-end. Back-end has all connections needed with hardware, steps, goals for evaluation, etc. All of them are functions, which can be called via API, in order front-end can use them. Front-end has the user interaction web site, with all its functionalities, and use back-end API to get the data related with the experience and for interact with the hardware. It is important to understand that some experiences proposed are similar, (e.g. frequency response (components, amplifier, filters, etc.) involve function generators and oscilloscope) so same web interface can be used, only must be changed the component connected. For these situations, part of the interface can be parametrized and loaded used parameters associated with the remote lab experience.
Sometimes, a lab experience only uses part of the instrument connected to the Instrument-Server. This let free a set of instruments, and if there exists a remote lab experience which use only those instruments, there could be interesting give to students the opportunity of take both experiences at the same time. With this option, number of user, which can take remote lab sessions, would be increased. This can be done with an “instrument/hardware requirement” in any remote lab experience. At any lab experience booking, instruments associated to that experience are booked, and rest of experiences are checked. If any of them are possible, their time slots are let free for booking, in other case, time slots overlapped with the one booked, are booked, as “Instrument-Server booked, experience not possible”.
Some remote lab experiences would need test-boards, which are connected with the Instrument-connector and are controlled as another instrument, controlling sources, switches, and detecting its presence or not. Experiences associated to test boards are only available when test-boards are connected to the system.
As indicated before, requirements for Instrument-Server is a computation system, which can run Python and can interact with the Instruments present in that Lab Site. Depending on those instruments and its requirements, in relation with the communication, Instrument-Server can be implemented in a Single-Board Computer as Raspberry pi (Rpi), or ever, using alternatives to Flask, in a microcontroller as ESP32 with microPython, but this option is more complex, proposed system recommends hardware which support Flask. For a usual set of instruments, taking in consideration that an Instrument-Server has one client at time (in addition with communication with main server) a Raspberry-pi V3b has enough computation power and interfaces to interact via LAN, and USB Instruments, even with the camera streaming. In relation with computers, there are not needed for Instrument-Connector a high computational power system, with at least 2-4GB RAM (depends on the OS), 1 core with 2 GHz, Windows 10, Linux or OSX works fine.
3.2. Reception-Server
In relation with the single server, which manage all the system, it is named Reception-Server. This server is point where the user interacts, and all its experience is managed inside this system. This server is this link among users, out of the University network and Instrument-Servers, in University Local Network. This server need special network configuration, due to it must be reachable from the internet, so it must have a domain or sub-domain associated, at the same time to it can access any system in the University Network, in order to reach Instrument-Servers. Actually, only are exposed common web ports (80, 443) to the internet.
Reception-Server host the user database and manage the user login system using the capacities of Flask-User. This extension manages user authentication, sing up, user validation via email, and even gives a basic web-interface (customizable) for all steps. This solves programmer all user related tasks. As all user-logging systems, passwords are not stored. It is stored in database the result of a calculation done over the combination of password and username, called hash.
Reception-Server host the Shift Manager. This is a compound of databases entries and interactions. Lab technician must create time slots duration per lab experience, set available experiences, and Instrument-Servers available time, in order to create available time slots. When time slots are created, they can be booked, with the restrictions sets by the fair use rules. Fair use rule ensure that all users can access all experiences. As indicated before, a basic fair use rule is a limit of simultaneous booking (one per user). Depending on the number of users and the number of time slots available per experiences, a maximum number of tries per user per experience can be set. That rules can be one or two, or a complex rule as one until everyone has done the experience, or one in this time range, giving in a time period the chance to everyone, and then, giving the chance to any user to repeat an experience. These rules may seem complex, but they are simple, having in the database a register of all experiences taken, with date, user, and other data of interest. Only reading the database with the proper filters, all conditions can be tested, and every condition check can be implemented with the condition as a zero limit avoid its application.
Reception-Server is a manage server, it does not host any instrument or experience. However, it need to know the Instrument-Servers, which are present in the network. This implies the IP address, API commands and related ports (common for all Instrument-Servers), Instruments and experiences available, time range in which they can be used, etc. Periodically test connection is done in order to detect sudden disconnections. As Reception-Server is designed for manage the whole system, some configuration of Instrument-Servers can be change from Reception-Server, as Instruments available, time range in which system can be used, experiences available, fair use rules, etc.
Reception-Server is the endpoint for the user experience in any moment. User registration, booking time slots, and take tests, actually is done in Reception-Server. However, remote Lab experiences are host in Instrument-Servers, whose are not reachable by users. This is solved with a forward done by Reception-Server. Instrument-Server associated with the lab experience shows its web-interface, and Reception-server create a SSH tunnel, creating a forward of that web-interface to an Iframe (a web-site object) inside the main interface of the Reception-Server. With this, user still in Reception-Server, and can interact with Instrument-Server. SSH port forwarding can be done with openSSH, and Python has a module to manage it, so connections can be created easily, and stopped when needed by the back-end. As no ports want to be open, a redirection to a URL, under the Reception-Server domain is done.
Users must register in the Reception-Server, and include its identifier in the Learning Management Systems (LMS), as Moodle, is it is used in lessons. With this, data can be packed and prepared to be uploaded to the LMS automatically.
When a user books an experience, data is exchanged with the related Instrument-Server, and an instrument compatibility check is done. In that moment, non-compatible experiences are detected, and all time slots overlapped with the booked one, are booked as “Instrument-Server booked, experience not possible”, as indicated before. User booking (time slot, experience, and user identifier) is registered in Instrument-Server, in order to prepare the experience, at the booked time.
If a booked time slot is un-booked, a search for “Instrument-Server booked experience not possible” books in overlapped time slots, for the same Instrument-Server. For each one, an instrument compatibility test is done with time slots overlapped with them. Slots booked as “Instrument-Server booked, experience not possible” (it could be possible that next or previous time slot of other experiences are booked, overlaps with tested time slot, and are not compatible), if results non-compatible, time slot still booked as “Instrument-Server booked, experience not possible”, if not, time slot is change to free for be booked.
3.3. General Concepts
One of the most important part of the remote lab experience is the camera. This implies a live streaming during the experience. It is important to understand that, depending on the camera quality, and the frame per second (fps) sent, data flow involved could be too high. Therefore, it is important to control these two parameters, and adjust them, according to the experiences. If only slow changes are expected, 5-10 fps could be enough, but for watch an Oscilloscope, at least 20 fps are needed. Quality should be revised for each experience, depending the surface the camera is recording; in order to information streamed can be read.
Even when SQLAlchemy disconnect partially programming of database with ORM, database type used could include more or less options in those ORM. In particular, classical SQL databases as SQLite, MySQL or Oracle, are pure relational databases. This implies a strong data relation and order, and a very fix data structure. All data are organized in tables; each row of each table has the same number of columns (cells). Each cell is one data, of one data type. Each one of them has its particularities. However, there is another database type, PostgreSQL which works as same as they are, and include a special data type JSON and JSONB, which are data structures, in a cell, where any number of data (non-limited to the number of columns), each one labelled with a key. Moreover, JSONB included search functions, as seen in SQL instructions for search data in column. This kind of variable is useful for store interaction logs, tries, goals, steps of experiences, and other data in a flexible way. Taking one table of experiences, instead one table per experience. For that reason, PostgreSQL is the database selected. Actually, this procedure, which is done by the database engine, can be done in a more basic way, with blob (binary large object) or text variables, and load there JSON variables. Then, recover and decrypt the data into a python variable. Anyway, if a usual relational database wants to be used, and only relational data want to be stored, data, which is stored in each step, is fixed and one data model (table) per experience is introduced.
Instrument-Server usually have direct connections with Lab Instruments, as USB, or GPIB. This kind of Instrument-Servers are not hot swap. However, if connections with all Instruments are done via LAN, Instrument-Server could have a redundant copy, and, in case of fail, change the destination for forwarding from the main system to the backup one. Most Usual situation is the first one, so a periodical complete backup of all systems for all Instruments Servers is highly recommended.
In relation with the Reception-Server, this server has not any specific hardware connected, so a redundant server can be connected, with a periodical copy of the database. If the main Reception-Server disconnect from the network, the redundant one takes its place. For Instrument-Servers, this rule could be implemented in Reception-Server, but in this case, we need a previous server, which redirect the data, or implement routing rules.
With all presented, a stable and scalable system is obtained, it is easy to configure (almost all configuration in Reception-Server, even of Instrument-Servers) and programming, with a base of required programming languages. General system structure and data flow is shown in Figure 2.
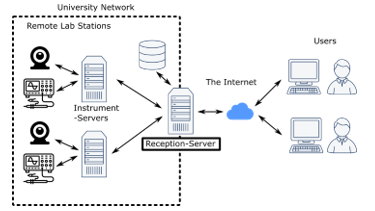 Figure 2: System global structure and data flow.
As indicated before, user traffic ends at Reception-Server and is Reception-Server that reaches Instrument-Servers. Reception-Server only has opened ports 80/443, so it is safe against attacks.
System cannot be properly defined as free of use or non-proprietary, even when all languages and packages in the core are free of use and distribute, due to Instrument-Connector may require privative drivers. Designed system core has not copyright lock or charge, all modules are free of use (some of them “”as is”, without modifications), including author references or copyright.
4. Integration in Engineering Sessions
In engineering teaching, there are too much knowledge to communicate to students, but as technical teaching, many of that knowledge is related with real world aspects, interactions, cause and consequence. In engineering, it explains how things work, including how the physical laws on which the function of those things are based work. Even in most situations complex mathematics support those explanations, real examples can be done in Labs, and students can see a real world example of those theoretical concepts that they are been studding, only supporting by numbers.
This is the reason of Lab sessions in university education, give students real examples of theoretical concepts studied. However, an engineering student must study many concepts, and this implies more theoretical hour than lab session hours. In addition, in a two hours’ theoretical session, many concepts can be explained, and in a two hours’ Lab session, only few concepts can be put in practise, due to they must be examined careful with Lab experiences.
For all explained before, there is not enough time to put in practise all concepts explained in lessons, and that is not the best for students. Searching a learning improvement, more lab time is needed, but there is not available lab time or professors. This can be solved with remote lab experiences. Even when students are not touching hardware, it has been proved in [1] that remote lab is a better solution than simulated lab, when no access to lab is possible.
Moreover, in special situations, as seen with the globally outbreak of COVID-19, even programmed physical lab session may not be possible, or may be reduced. For those situations, remote lab experiences are a great option.
The point is to configure a lab station, for work all time as remote lab station, and even lab stations used for lab sessions, could be set to remote lab stations out of Lab session hours. This requires a configuration, which must be done for the Lab technician. With these options, students can take remote lab experiences any time, with a station exclusively remote, or only out of lab hours, with flexible lab stations. As same as the fair use rules, this depends on the number of students, and instruments and stations available.
As indicated before, remote labs stations are designed for a set of experiences, due to in most areas of engineering, same set of instruments are needed for take all experiences in a subject, or in a part of a subject. E.g. in electronics, if DC bias point is studied, a controllable DC power source, Voltmeters and Amp meters are needed for almost any test. This kind of experience could be behaviour of a capacitor or inductor in DC, in bias point, resistor V-I response, amplification of a transistor without polarization (beta calculation), polarization of a transistor, amplification of an Operational Amplifier in DC, etc. With a Function generator, constant level DC power sources (5V, 12V), and an Oscilloscope, AC response can be studied, with experiences as amplification in AC of an Operational Amplifier, amplification of a polarized transistor, frequency responses of filters, frequency response of components. In addition, mixing, VCO (voltage controller oscillator), limits of Operational Amplifier in relation with feed voltage, effect in transistor amplification of polarization voltage, etc.
As seen, in electronics, there are few equipment, very common in many experiences, and there are others, as pulse generators, clocks, counters, which can give other experiences. The difference among experiences are the components connected to them and the configuration (connections among instruments) needed. A common design can be done for all experiences and Instruments. Creating experience boards, where only instruments must be connected, and a connection with Instrument-Server, in order Instrument-Connector can detects it and make available experiences.
4.1. Experience Board
An example of that common design is done, throw the schematic design of a board for an experience with an Operational Amplifier (LM358), as inverter with variable gain, and switchable to open loop.
First, common elements must be described, starting with the computer communication capacity of the board are shown in Figure 3.
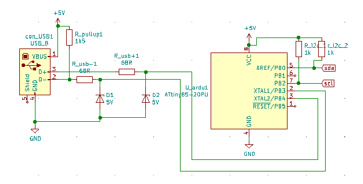 Figure 3: Communication system of test board.
Chip ATtimy85 is a low cost DIP-8 chip, which can be configured with a special bootloader for load Arduino code from USB, without the needed of a USB-RS232 conversion chip, even a serial communication. This chip works with 5V, so even with the USB power can be feed, so only with the elements required for the safe connection for the data transfer (1 pull-up resistor, zener protection diodes, and current limit resistors) chip can be connected with a USB connector.
This chip has few terminals, most interesting ones, I2C communication. This kind of communication allows connection of some devices to a single port (two wires, with pull-up). Nowadays there are digital elements, as ADC, digital potentiometers, DAC, current meters, and some wind of sensors, with I2C interface; so many elements can be integrated. Use of external ADC and DAC instead internal of ATtiny85 make easy the design, in order some of them have an analogue level and a digital level, so they can communicate with chip in 5V, and operate in 20V. This is the case of the digital potentiometer selected for this board, which will be explained later.
In relation with lab instruments connections, as seen in Figure 4, most commons instruments in electronics are DC controlled power source, Function Generator and Oscilloscope. DC source has two outputs, each out with two connections type banana, Function Generator has an output type BNC connector, and Oscilloscope has two inputs type BNC.
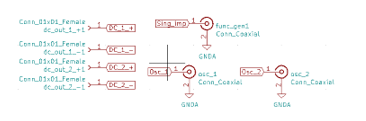 Figure 4: Connections to Instruments of test board.
This connections, join with the ATtiny85 are the base of most test boards (unless other instruments are required, as counters or pulse generators, but those are special experiences, special boards are created, with more connections).
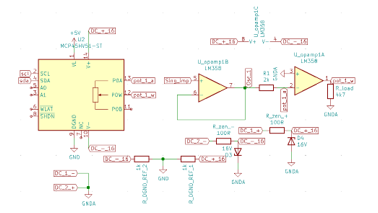 Figure 5: Inverting amplifier with Operational Amplifier experience.
Figure 5 shows the components related to the specific experience, a digital potentiometer, with I2C communication, which can work up to ±18 V, and a LM358 Operational Amplifier, with a maxima power feed of ±16 V. As positive and negative voltage want to be controlled, both DC inputs are used, one for positive and the other for negative voltage. With that objective, negative output of DC1 and positive output of DC2 are connected together to GNDA (analogue ground). Now DC1 controls positive voltage and DC2, negative voltage.
As DC power source can generate more than ±16 V, voltage is limited with zener diodes, to that level, protecting the board. Digital potentiometer requires that digital ground be in the range of analogue voltage, so a resistor divider is done, from limited voltage, and the middle point is connected to the digital ground.
As LM358 has two Operational Amplifiers, one is used as input buffer, and then, as input resistor a constant resistor is used. Digital potentiometer has a limit of ±12.5mA, and input resistance (R1) is the one, which set the current. Fixing the current to a level under the limit, for the extreme input, system is stable. Digital potentiometer is used as feedback resistor (R2), and its impedance could be from 0 to 10kOhms, taking negative amplifications (inverting) lower and upper to one. Digital potentiometer can disconnect terminals, so feedback resistor can be removed, examining Operation amplifier in open loop. For ensure a proper measure a load resistor is included.
As seen this board structure is flexible in its design, and can be change to many electronics experiences, even integrating some in the same board. A price evaluation is done, showing in Table 1 common elements for some experiences, and in Table 2 specific elements for this experience.
Table 1: Price related to common elements
| Element | €/unit | Units | € |
| ATtiny85 | 1 | 1 | 1 |
| USB connector | 0.5 | 1 | 0.5 |
| Diodes | 0.16 | 2 | 0.32 |
| Resistors | 0.03 | 5 | 0.15 |
| Banana connectors | 2 | 4 | 8 |
| BNC connectors | 2 | 3 | 6 |
| Total | 15.97 | ||
Table 2: Price related to specific experience elements
| Element | €/unit | Units | € |
| LM358 | 0.6 | 1 | 0.6 |
| MCP45H51 | 1.31 | 1 | 1.31 |
| Diodes | 0.16 | 2 | 0.32 |
| Resistors | 0.03 | 5 | 0.15 |
| Total | 2.38 | ||
As seen in tables, whole experience, including common and specific elements does not require expensive elements, being all needed components 18,35€. However, as common elements can be used for some different experiences, edge connectors can be included between common and specific part, creating a test system, with a common part, and a changeable experience. In this situation, experience must identify itself for the computer, and it is done including an EEPROM memory, with I2C communication, in the test board. Edge connector has a cost of 3€ (only one is needed, male edge connector is part of the board and EEPROM chip has a cost of 0.1€. With this increase, and minimal design changes, same interface board to PC and instruments (the most expensive part) can be used to some experiences board. At the same time, this change allows to replace interface board or experience board, if any of them fails, and is not needed to replace the whole board.
PCB design for higher frequencies must be done carefully, in order not to introduce coupled effects. Some experiences, as the one proposed in this board, are designed for frequencies up to 1MHz. This make them sensitive to track routes, even to track shapes. This point is the actual develop point, ensure no
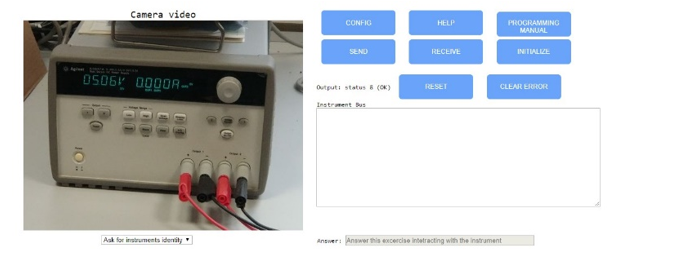 Figure 6: Main web interface GPIB SCPI experience
interaction is done, in interface board (for all Oscilloscope or Function Generator frequency range) and in experience board (for all frequency required in the experience).
This is an iteration process, due to each new design must be implemented and tested, and take some time. For that, this line of test board will not be implemented jet, up to all test finished.
4.2. Experience example
Remote lab experience which has been implemented as example is a DC power supply control using Standard Commands for Programmable Instruments (SCPI) (the base of the VISA protocol), connected with the General-Purpose Instrumentation Bus (GPIB). Communication with many lab instruments ends in a VISA commands exchange, throw different busses. This experience gives to students the chance to experience and understand this communication. As indicated before, the camera streaming is the base of the remote lab experience, an in this situation is recording the front panel of the DC power supply. Whit that, students can see in any moment the reaction of the Instrument to any command sent to it (errors, changes in display, changes in operation mode, etc.). For this remote lab experience, simple interaction page has been designed, which in seen in Figure 6.
Power supply connected in this situation is Agilent E3646A DC power supply, and it can be seen in the camera-streaming box, al left. This experience has steps, oriented as questions, which can be answered in any order. Those questions are listed in the combo-box under the camera streaming, and the selected one is the one, which must be answered. Depending on the question, should be answered in the proper answer box (at the right of the question combo-box), or interacting with the proper SCPI command with the instrument.
“Instrument Bus” text box is the point where the user must write the instructions to be sent to the Instrument, when the button “SEND” is clicked. In this field, responses taken from the instrument, when “RECEIVE” button is clicked, are shown too, being the SCPI interaction point. When “SEND” and “RECEIVE” are clicked, in addition to interact with “Instrument bus”, Output Status is updated. This value indicated communication status, related to data send process (if information has been delivered, if Instrument can be reached, if there are data to be read, after an instruction with data return, in the instrument and another instruction has been sent), in other words, indicated communication OK, or ERROR (with ERROR specifier).
In case of ERROR for instructions, there are two options, “CLEAR ERROR” erase error vector in the Instrument, clearing error indicator in front panel. Other option is “RESET” completely the Instrument, clearing errors and putting all settings to defaults values. If ERROR is related not to be able to reach instrument, maybe GPIB configuration, which can be configured in “CONFIG” should be revised. There, GPIB address of the instrument, and for the controller should be set. Bus has to be “INITIALIZE”, at experience start, or after each configuration change.
There only left “HELP” where a popup with information related with experience interaction and with the experience, procedure and steps are explained. In addition, “PROGRAMMING MANUAL”, where a popup is opened which the programming manual of the Instrument, with all instructions needed for the experience.
When a proper answer has been done for a step (with the proper interaction with the Instrument or with the proper answer in the answer box), the background for it turn into green in the combo-box. When all steps are green, experience finished with a pop-up, but Instrument-Server still connected during reserved time-slot, for interaction with the Power Source.
With this, experience is explained. Evaluation is detailed in following section.
5. Learning Results
As part of experience design, goals are defined (pass all steps in experience time, pass steps with less than n tries, take less than a specific time in pass the whole experience, take at least two tries in at least three steps, for ensure student is not copy another student answers, etc.). Those goals can indicate a mark, related to experience evolution, as same as a when students fill a form with measures and answering questions in Lab sessions. This is an auto-evaluation, during the remote Lab session, which is complemented with evaluation activities.
First, it is vital to know if there has been any problem or difficulty in user interaction with the remote system. For that, a quick survey, related to remote interaction is done, where “Easy to use”, “Camera quality”, “Response time” and “Proper time slot for experience” are asked, and must be evaluated in the range of: Not work, Very Poor, Poor, Adequate, Good, Very Good. In any moment, if system receive some Poor or Very Poor in an area, a warning is raised to administrator, in order to revise the experience or connection. If “Not work” is marked, an Error is raised to user experience register, in order to mark as not valid this try, and open an additional one. In addition, this must not be an anonymous survey, due to in case of Very Poor or even Poor, difficulties could be get to develop the experience, and that should be considered.
Auto-evaluation, gives information about how students follows experience steps. However, Lab experiences and remote Lab experiences, are oriented in reinforce theoretical concepts. Proper succeed in remote Lab experience is ensure those concepts has been understood. With that objective, a fast knowledge quiz is take by students, after take the remote Lab experience, related with the concepts reinforced in the experienced. This test is used for set the mark of the experience, joint to the auto-evaluation. Moreover, it is an indication for evaluate the experience, if none student passes this quiz, experience should be re-designed, due to it is not reinforcing the concept as desired.
As time during which can be in connection with Instrument-Server is limited by time-slots, survey and quiz could be a problem, due to they take time of experience. For that reason, these exercises are implemented in Instrument-Server, due to they are related to the remote Lab experience, but users perform them in Reception-Server. When experience ends, this is when user pass all steps, or time slot ends, Instrument-Server send to Reception-Server evaluation activities. From this moment, user can perform them during an assigned time (by default 1 day), without the needed of connection with Instrument-Server.
With all that, evaluation is take in two levels, during the experience, automatically, and after the experience, with survey and quiz. At the same time, student evaluation helps for the evaluation of the experience itself, detecting point to change or improve, or in the other hand, validating the functionality of the experience. With all these, remote lab experience is continuously evaluated, by survey, and using student’s marks.
Additionally, all Student interactions with remote lab experience, are logged and saved in order to revise auto evaluation protocols, or if needed to manual revision.
6. Conclusions
A remote lab system has been designed, with the capacity of interact with almost any hardware, due to Instrument-Connector can be designed for interact with almost any kind of protocol or driver. It is easy to scale, adding or removing Instrument-Servers, with a simple enter in the Reception-Server, the single administration Server. Even the management of the system, composed with many servers, have been simplified, and almost all of it is done in the Reception-Server.
In relation with remote experiences, as Instrument-Connector can interact with almost any hardware and the combination of HTML+JavaScript can create a huge set of visual experiences in the web browser, almost any experience can be implemented.
Special network requirements (the most complicated part in complex infrastructure network) are only needed in Reception-Server, where external access are needed, with a domain and common web ports opened (80 and 443). Instrument-Servers only need to be in the same network than the Reception-Server.
As educational experience, evaluation system is designed, as a multi-step evaluation. First, goals are set during the experience, and that implies an auto-evaluation, join to a log of the user interaction with the experience. This is used to revise possible errors in steps or auto-evaluations. At experience ends, two fast exercises must be taken. One is a fast survey, about user interaction, in order to detect possible problems in camera quality, latency, time associated to the experience, information done, etc. The other one is a short quiz related to the theoretical concepts related with the experience, in order to confirm that experience has been useful and has reinforce those concepts.
Conflict of Interest
The authors declare no conflict of interest.
Acknowledgment
The Spanish Ministry of Economy, Industry and Competitiveness [Grant No. supported this work TEC2016-77632-C3-3-R]. The authors would like to thank the Andalusian Government for funding the Research Unit PAIDI-TIC-168 in Computational Instrumentation and Industrial Electronics (ICEI) and the University of Cádiz.
- K. Jona, R. Roque, J. Skolnik, D. Uttal, D. Rapp, “Are Remote Labs Worth the Cost? Insights From a Study of Student Perceptions of Remote Labs,” International Journal of Online and Biomedical Engineering (IJOE), 7(2), 48–53, 2011, doi:10.3991/ijoe.v7i2.1394.
- I. Evangelista, J.A. Farina, M.I. Pozzo, E. Dobboletta, G.R. Alves, J. García-Zubía, U. Hernández, S.T. Marchisio, S.B. Concari, I. Gustavsson, “Science education at high school: A VISIR remote lab implementation,” in Proceedings of 2017 4th Experiment at International Conference: Online Experimentation, exp.at 2017, Institute of Electrical and Electronics Engineers Inc.: 13–17, 2017, doi:10.1109/EXPAT.2017.7984378.
- J. Garcia-Zubia, J. Cuadros, V. Serrano, U. Hernandez-Jayo, I. Angulo-Martinez, A. Villar, P. Orduna, G. Alves, “Dashboard for the VISIR remote lab,” in Proceedings of the 2019 5th Experiment at International Conference, exp.at 2019, Institute of Electrical and Electronics Engineers Inc.: 42–46, 2019, doi:10.1109/EXPAT.2019.8876527.
- S. Rigby, M. Dark, “Designing a flexible, multipurpose remote lab for the IT curriculum,” in Proceedings of the 7th ACM SIG-Information Technology Education Conference, SIGITE 2006, ACM Press, New York, New York, USA: 161–164, 2006, doi:10.1145/1168812.1168843.
- L. De La Torre, M. Guinaldo, R. Heradio, S. Dormido, “The ball and beam system: A case study of virtual and remote lab enhancement with Moodle,” IEEE Transactions on Industrial Informatics, 11(4), 934–945, 2015, doi:10.1109/TII.2015.2443721.
- I. Titov, “Labicom.net – The on-line laboratories platform,” in IEEE Global Engineering Education Conference, EDUCON, 1137–1140, 2013, doi:10.1109/EduCon.2013.6530251.
- I. Titov, A. Glotov, Y. Andrey, V. Petrov, “Labicom labs: Remote and virtual solid-state laser lab, RF & microwave amplifier remote and virtual lab: Interactive demonstration of Labicom labs in winter 2016,” in Proceedings of 2016 13th International Conference on Remote Engineering and Virtual Instrumentation, REV 2016, Institute of Electrical and Electronics Engineers Inc.: 336–338, 2016, doi:10.1109/REV.2016.7444496.
- M.D. Da, “Rasberry Pi Based Remote Lab Implementation,” International Journal of Scientific & Engineering Research, 7(8), 2016.
- W. Farag, “An Innovative Remote-Lab Framework for Educational Experimentation An Innovative Remote-Lab Framework for Educational Experimentation,” International Journal of Online and Biomedical Engineering (IJOE), 13(02), 68–86, 2017, doi:10.3991/ijoe.v13i02.6609.
- S. Odeh, E. Ketaneh, “A REMOTE ENGINEERING LAB FOR COLLABORATIVE EXPERIMENTATION,” International Journal of Online and Biomedical Engineering (IJOE), 9(3), 10–18, 2013, doi:10.3991/ijoe.v9i3.2500.
- I. Angulo, L. Rodriguez-Gil, J. Garcia-Zubia, “Scaling up the Lab: An Adaptable and Scalable Architecture for Embedded Systems Remote Labs,” IEEE Access, 6, 16887–16900, 2018, doi:10.1109/ACCESS.2018.2812925.
- 10 top Programming Languages in 2019 for Businesses.
- Top 10 Programming Languages of the World – 2019 to begin with… – GeeksforGeeks.